Old road Bike to new Cyclocross Series–Part 1–Stripping the parts
This is the first of a four part series on converting an old mid 1980s road bike into a fairly decent modern Cyclocross or commuter bike
Stripping the old bicycle
So to get started I had to strip the old bike and save what could be reused and decide what needed to be replaced. Some parts could be reused, others had to go. Also needed to make sure everything could be removed before I proceed any further.
I use a work stand and it was one of the better investments I have made as I use it over and over again.
The Fiori Napoli was I think a bit of a mid range bike for this interesting line of bikes that came out from Norco in the mid 1980s. I think Norco was trying at the time to compete against companies like Miele which had bikes that were seen as a step above the usual department store fare and had a flare of questionable Italian pedigree.
The Napoli has a few odd graphics considering what it was. Other than the name and a few parts it had little to do with Italy but the frame displayed a lot of Italian flare.
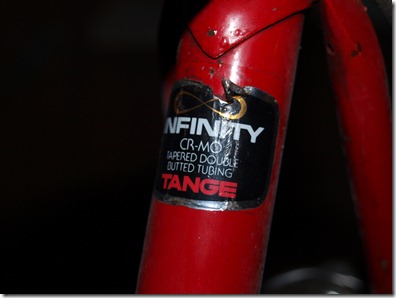
For one the frame was built from good quality Tange Infinity steel tubing from Japan. That was one reason I wanted to reuse it.
Hard to see in this shot but there is even a small “Japan” at the bottom of the seat tube so the frame was very “confused”.
And besides the brakes nothing else is remotely Italian. But yet this is marketing and it adds a bit of flare to the bike.
But this is about the future so time to do the strip.
Removed the wheels and put there in a corner. The rear probably won’t use again (its not wide enough…more on that later) but front is still good and could be reused.
The brakes are older Modolo Speedy’s. Modolo was reasonably high end stuff so while these brakes simply don’t work anymore they are worth keeping. Removed all the cables from the bike and these in turn popped off fairly easily. I placed them into the keep box but not to reuse.
Anytime you remove a seatpost from an old bike you have to worry about it being rusted into place. I was pleasantly pleased to see that this wasn’t the case with the seat post here and pop out it came. I will reuse this and the bolt that is used to keep it in place.
I am going to rebuild this up with modern combined shifters and 10 speed so the derailleurs can be removed. The rear is a nice Campagnolo mid 80s Victory which was on the old Gardin and certainly a keeper, but not for this bike. Broke the chain and threw it out, may have been the original?
The front derailleur was a suntour cyclone model and was pretty seized at the seat tube. I don’t expect to reuse this so simply needed to get it off. Took a bit of effort and used a screw extractor in the end but it popped off.
Cranks were next and they were stuck..hard. Can’t say I have heard of Sakae before but turns out this was the parent company of Suntour. Typical parts bin stuff here with a different vendor for each component it seems.
The non drive side I was able to extract after a bit of pulling but the drive side was simply unable to budge. I pried and I pulled. Finally I just applied plain old hammer power and pounded the thing out. It was ruined but I didn’t plan to reuse (needed a 10 speed crank) so that was fine.
Downtube shifters were a bit seized as well, which was surprising as they tended to shift fairly well. Had to pry these off. I won’t reuse them.
Next up was the handle bars and shifters. The tape, almost just carpet tape, came off in bits and pieces. Then the brake levers were removed and again they won’t be reused. The handlebars are Nitto Olympiad. Nitto seems to be a well regarded Japanese company still in existence today and I liked these overall so will keep them. Ended being a pretty tight fit to remove from the stem and they got a bit scratched up but then put aside for later use.
I love these older style stems. This one was Nitto as well and was a bit abused looking. You can change the height in about 2 minutes and not 100% why we went away from them but it was easy to loosen the bolt but it was seized in tight and needed a bit of hammer time too to get loose. But it works and I want to keep using this one so into the reuse pile it went.
Now I was down to two parts that needed a bit more effort and finesse. The headset and the bottom bracket. I had not removed a headset before so needed to refer to the internet on this one. As usual Sheldon Brown’s links were the best. Here is a nice photo from that page.

First loosen and remove the upper locknut
Then removed the race up and unscrew it up and over the fork
Then pull the fork down. In the end was pretty easy. I will reuse this fork and also decided not to restore it as I like the chrome look and I think it would have been expensive to rechrome it. It’s a bit rusty but works fine. Will need the headset as well so that will be rebuild and reused.
Now for the bottom bracket. This is one area that is still relevant size wise today and meant I was able to reuse this frame. It’s English thread and even today most bikes come like that. So I can upgrade to a new bottom bracket and crank no problem. Also its Shimano, so yet another vendor!
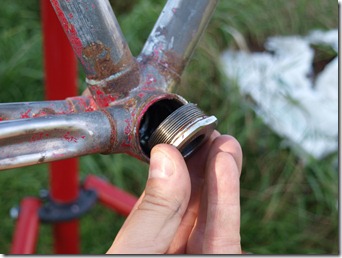
Using my trusty bottom bracket tool removed the ring around the non-drive side.
The bracket end itself uses a special pin hole process to remove and there are specialty tools to remove it.
Or you can just use some needle nose pilers(!)
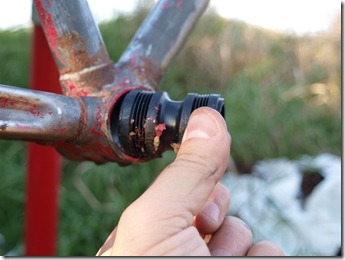
Once loosened you can hand crank it out and the spindle is exposed.
Pull the spindle out.
Now the drive side, since it is cranked tight with every rotation of the crank, is usually stuck harder than hard and that was the case here. Again you can buy specialty tools for this or you can use these:
An adjustable wrench, a pulley remover, a washer and yee trusty hammer.
Use the washer and the pulley remover (I think its called a pulley remover?) to press the wrench into place, make it as tight as possible. Then take your hammer and do your best Thor impression. If you are angry about something this is good therapy.
Pow…the bottom bracket with give.
Then you can unscrew it by hand
And remove this inner thingee. I may use this bottom bracket on an older bike someday but not this one so we won’t see it again.
And there you have it. I had the frame completely stripped of all its parts and ready to be cleaned for repainting. And that is part 2.


Just wanted to say thanks, you inspired me to take all of my Cervelo parts and modernize a Fiori Roma. It is a fantastic commuter bike that I take to work everyday.
Thanks again,
Chris